This post may contain affiliate links. If you buy something from one of our links we may earn a commission. Thanks
Unlike traditional gardening, learning how to grow pea shoots without soil allows you to skip the muss and fuss of soil-based gardening making it a low-effort and hassle-free way to enjoy fresh greens all year round.
Pea shoots are a delicious and nutritious addition to any meal, and they are incredibly easy to grow indoors even in small spaces even if it’s your first time.
So if you grow your own you can skip going to the grocery store so often.
Ditch The Dirt!
Let’s face it soil is messy especially indoors in your appointment. It is heavy and you need to store it somewhere. It is also hard to get rid of once you’re done using it.
But what if I told you there is a great way to grow pea shoots or any other microgreen without soil?
Well, there is by using grow mats and I will show you how to do it in 7 easy steps even a complete beginner can follow.
How To Grow Pea Shoots Without Soil
Step 1: Gather materials
The first step before you get started, you’ll need to gather a few supplies. You’ll need pea seeds, a seed tray or growing container with drainage holes, water, and a grow light (if you don’t have access to natural sunlight).
Get Your Grow Mats
You will also need coco grow mats. They are made from long fiber coco and are a lot like an old-fashioned doormat.
So there is no loose coco coir in the growing medium.
The grow mats below are cut to size and fit in a 1020 tray but you can cut them if you need to. These are what I use.
There are also grow mats made from jute and hemp but I have not tried those. I am very happy using these. I cheated a bit with these and added a thin layer of coco coir on top of my sprouting pea plants.
It looked like they were having some trouble growing into the mat. I am sure eventually they would have.
I think these grow mats work a bit better with smaller seeds. Get Your Pea Microgreen Seeds
The last thing you want is to use a cheap plastic tray that cracks on you while growing in it.
Soak Your Grow Mat
You want to soak your grow mat for several hours so it is well-hydrated. I submerge it in a grow tray to do this.
Step 3: Soak the pea seeds
Soaking pea seeds before planting is important for ensuring proper germination.
To soak seeds, simply place them in a bowl of warm water and let them sit for about 12 hours or until they plump up.
Step 4: Plant the seeds
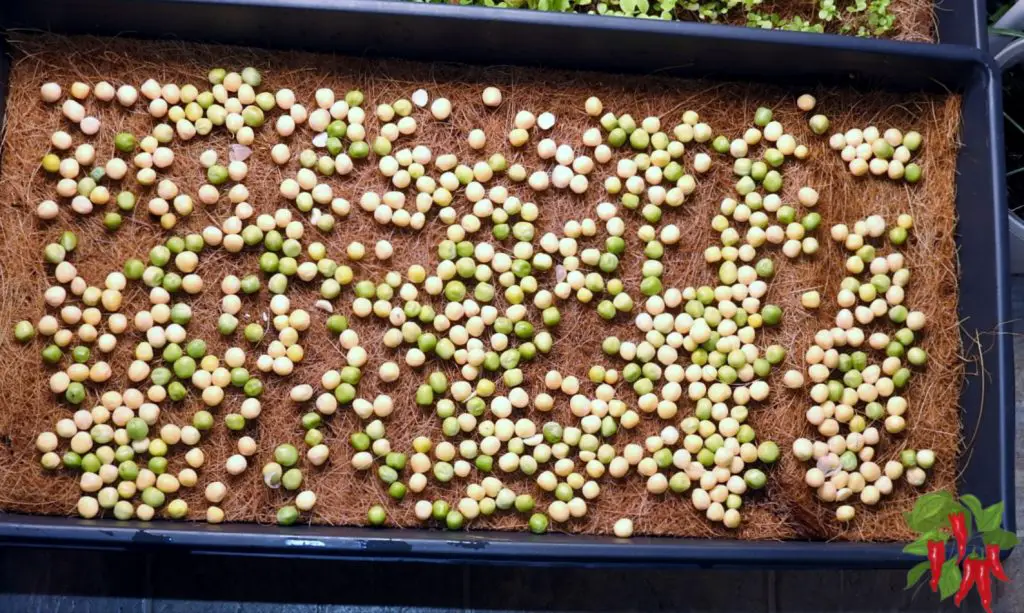
Once the seeds have been soaked, it’s time to plant them. Fill the tray or container with the seeds. Place them evenly directly on top of the grow mat.
Try to get them spaced out evenly about 1/4 to 1/2 inch apart. They should be almost touching.
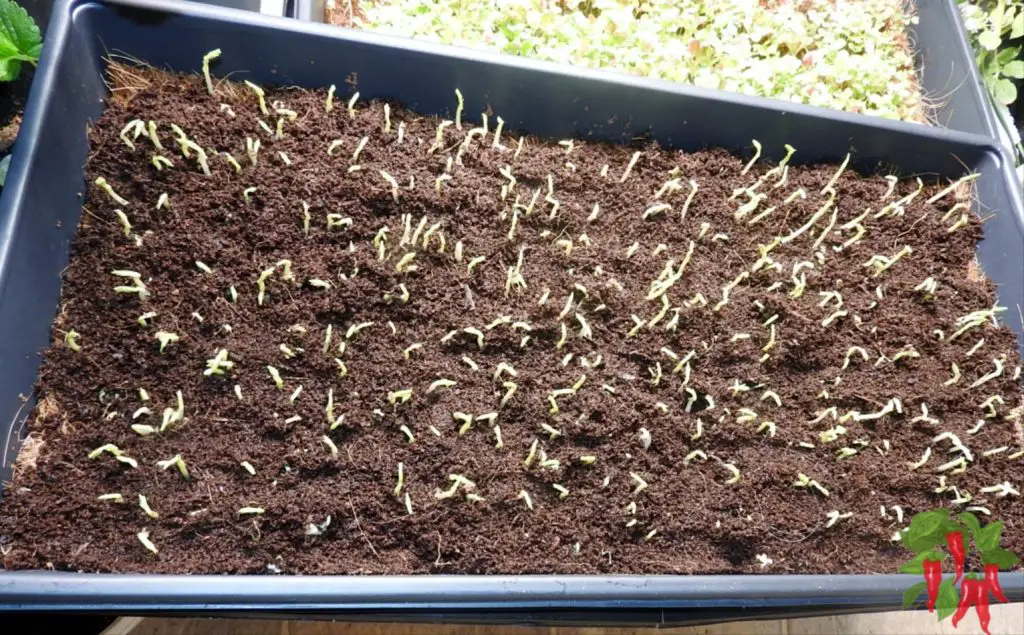
Mist your pea shoot seeds with a spray bottle to keep them moist while they are germinating.
I covered my pea shoots with an empty seed flat. It was not long before they germinated (2-3 days) and the pea sprouts began pushing up against the cover at which time I took it off and got them under a grow light.
Step 5: Place the tray in a sunny location
The young shoots need plenty of sunlight to grow, so it’s important to place the tray in a sunny spot that gets at least six hours of direct sunlight per day.
Under grow lights your plants should get 12-16 hours of light. Use a timer to turn your light off and on.
If you don’t have access to natural sunlight, you can use a grow light to provide the necessary illumination.
Most areas in the United States will not have enough natural light during the winter when days are short and often cloudy.
In the summer a sunny windowsill can work but if you want to grow anything during the winter time of year I really suggest you invest in an LED grow light.
Just be sure to place the tray near the light and use a timer to ensure the seeds get the right amount of light.
To keep the seeds hydrated and encourage growth, it’s important to give young plants enough water. Use room temperature water.
Check the moisture level of the seeds daily and add water as needed to keep the seeds moist but not waterlogged.
Make sure to use room-temperature water in a misting bottle and mist the top of the soil. Drain off any excess water and don’t let your tray sit in standing water.
Giving them too much water can cause root rot or fungal diseases.
Step 7: Harvest and enjoy the pea shoots
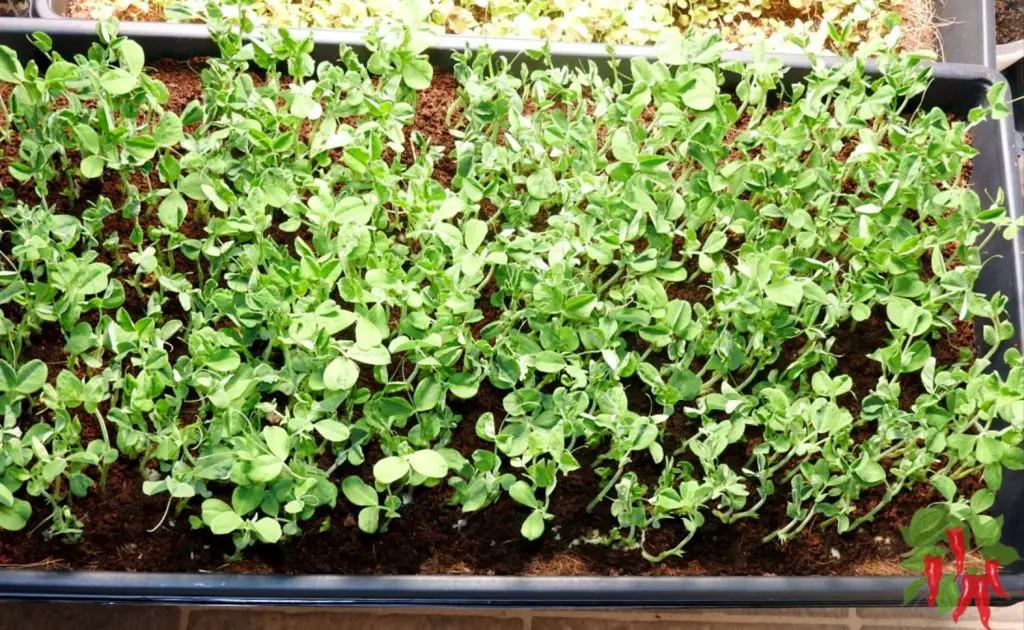
When the pea shoots are about 3-4 inches tall, they are ready to be harvested. Unlike other microgreens, your pea shoots will have true leaves.
You can actually let them get a bit taller like about 6 inches and starting to show tendrils.
Peas may take a bit longer than some microgreens but they are worth the wait.
Use clean scissors to cut the shoots about an inch above the base, and enjoy them in salads, sandwiches, stir fry, or as a garnish for other dishes.
Don’t cut them at the soil surface if you want them to regrow. Leave a node above the surface of the soil and in a few days, the peas will grow back and be ready for another crop.
Storing Your Pea Shoots
You can store your pea shoots in the refrigerator for about a week. Store them dry and put them in plastic bags with holes in them. Place a paper towel inside the bag.
You can use a plastic container but it should have holes or you can use a paper towel instead of a top.
You want to make sure to store your microgreens dry and that they have airflow so they don’t rot. Keep them as cold as possible without freezing them.
Freezing Microgreens
It is best to use your pea shoots while as fresh as possible. But actually, it is possible to freeze microgreens.
Spread the dry microgreens out evenly on a tray and freeze them. You can blanch them first but I just freeze them.
Once they are frozen pack them in freezer bags or containers.
They will lose their crispness as they freeze. They will keep for about 3 months this way. They can be thawed and used for smoothies or added to soups or stews.
What Do Pea Shoot Microgreens Taste Like?
Pea shoot microgreens have a sweet, delicate flavor that is similar to peas. They have a sweet crunchy texture.
Some people describe the taste as slightly grassy or earthy. Not me. They taste a bit like edible pea pods to me.
Pea shoot microgreens are a great source of nutrients and add a fresh, flavorful element to a variety of dishes.
Do Pea Shoots Grow Back After Cutting?
Peas are one of the few microgreens that will grow back. Although most microgreens don’t need to be fertilized I recommend you fertilize your pea shoots if you want a second crop.
Final Thoughts
Growing pea shoots without soil is a simple and rewarding way to enjoy fresh greens all year round.
The pea shoots were a big hit for me and my friends that I shared them with also loved them. So I’m pretty sure you will like them too.
By following these seven easy steps, you’ll be able to harvest delicious and nutritious pea microgreens without using any soil.
Pea shoots are one of the few microgreens that do grow back after cutting so you can get 2 harvests from your tray.
This soilless growing method is a good way for growing any type of microgreen. Here is some more info on growing microgreens in trays.

 I cheated a bit with these and added a thin layer of coco coir on top of my sprouting pea plants.
  Get Your Pea Microgreen Seeds
 Get Your Pea Microgreen Seeds