Howdy, folks! Today, I’m excited to share with you some tips and tricks for setting up a hydroponic garden in a small apartment space.
We’re going to dive into a do-it-yourself system that’s perfect for those of you with limited room but a big passion for gardening. So, let’s get started!
Apartment Hydroponics Key Takeaways:
Space-Efficient: Hydroponics is perfect for apartment dwellers or anyone with limited space. A small closet or corner can be transformed into a productive garden.
Inert Medium: Use an inert medium like coco coir, hydroton, or perlite to ensure your plants receive nutrients only from the solution you provide.
Drip Irrigation System: A simple DIY drip irrigation system, controlled by a timer, can provide consistent and precise watering to your plants.
Reservoir and Nutrients: A reservoir holds the nutrient solution, which is delivered to the plants via the irrigation system. Regularly check and replenish the reservoir to maintain nutrient balance.
Lighting: Adequate lighting is crucial for plant growth. Invest in a good quality LED grow light to ensure your plants receive the necessary light energy.
Ventilation: Maintain proper airflow with fans and an exhaust system to prevent issues like mold and ensure healthy plant growth.
Ease of Maintenance: With automation in watering and lighting, hydroponics requires less daily maintenance compared to traditional gardening.
Yield and Growth: Hydroponically grown plants can yield more and grow faster due to the controlled environment and direct nutrient uptake.
Eco-Friendly: Hydroponics is a water-efficient method of gardening, and by growing your own produce, you reduce the carbon footprint associated with food transportation.
Experiment and Enjoy: Don’t be afraid to experiment with different plants and setups. Enjoy the process of creating your own indoor garden oasis!
The Setup
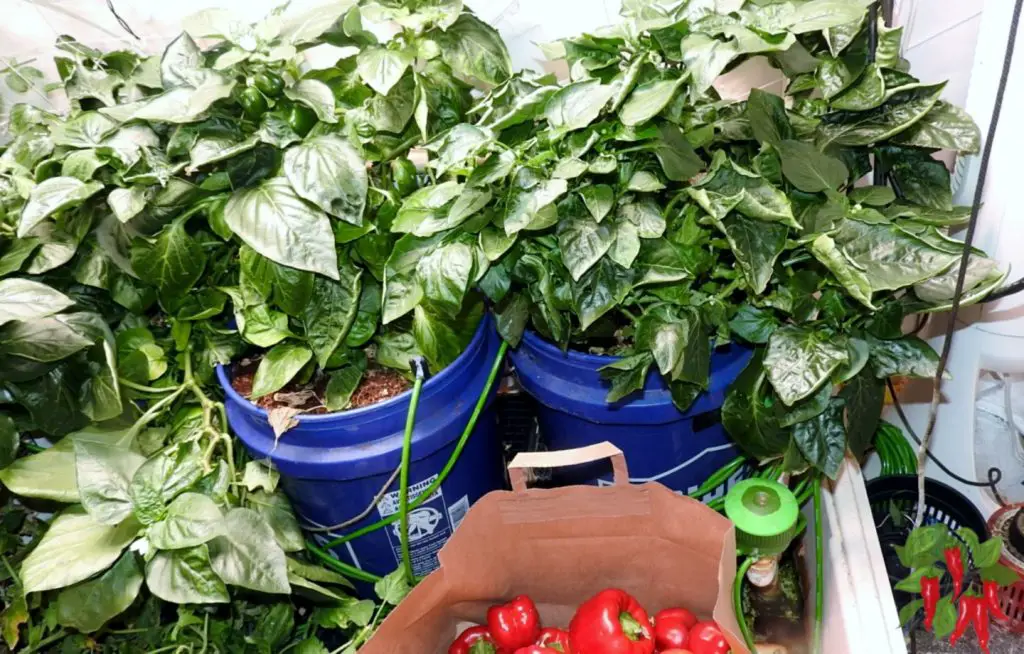
Imagine converting a small closet into a lush, green haven. That’s exactly what I’ve done here in my 3×6 closet, which is now home to thriving pepper plants and a tomato plant, all grown hydroponically.
One of the key components of hydroponics is using an inert medium, such as hydroton (also known as LECA) or perlite.
These mediums ensure that your plants receive only the nutrients you provide, keeping everything in perfect balance.
For this setup, I’ve opted for coco coir, an excellent inert medium that doesn’t supply any nutrients on its own, so you’ll need to feed your plants.
Each plant sits in a 5-gallon bucket filled with coco coir. The magic happens with a drip irrigation system, which I’ve crafted using manifolds and tubing that you can easily find on Amazon.
This system ensures that each plant receives a steady drip of nutrient-rich water, controlled by a timer for precise watering.
The Reservoir
The heart of this hydroponic system is the reservoir, a 27-gallon tote that houses the nutrient solution. A pump inside the tote sends the solution through the tubing to the drip manifold, providing each plant with the nourishment it needs.
It’s essential to have a tray or container to catch the runoff water, which can then drain back into the reservoir.
This setup not only conserves water but also makes the system more efficient.
The Lights
Lighting is crucial in any indoor garden, and that’s no different here. I’ve used an HLG 650R LED light, positioned a few feet above the plants.
This powerful light ensures that the plants receive consistent, adequate illumination for healthy growth.
The Ventilation
Proper airflow is also vital. I’ve installed fans to circulate air within the closet and an exhaust fan to remove warm, moist air.
This setup keeps the environment ideal for plant growth and helps prevent issues like mold or mildew.
Getting Started
To kick off your hydroponic journey, you’ll need a few key components:
A tray or container to catch runoff water.
Pots or buckets filled with an inert growing medium like coco coir.
A reservoir to hold your nutrient solution.
A pump and timer to control the irrigation system.
Adequate lighting to ensure your plants thrive.
Fans and an exhaust system to maintain proper ventilation.
Final Thoughts
Hydroponic gardening in an apartment is not only possible but also incredibly rewarding.
It’s a fantastic way to grow fresh produce in a small space, with less hassle from pests and soil-borne diseases.
Plus, it’s a fun project that can yield impressive results!
If you have any questions or need some advice, feel free to reach out in the comments.
And don’t forget to like and subscribe if you found this video helpful. Happy gardening, and remember to keep it green!
Until next time, take care and happy gardening!
Growing Green in Small Spaces: Unlocking the Potential of Hydroponics in Apartments
Here is a video that shows how to build a closet drip system for growing vegetables using plastic totes instead of a flood tray.
The smallest flood tray is 2 x 4 feet inside and about 28 inches wide outside and my closet is exactly 24 inches wide so they are a no-go.
So if you have a smaller space here is another method. You can get 24-inch wide or narrower totes. Home Depot has 24 x 36 mixing tubs and I have used them in the past in this closet.
Hydroponics at Home – How To Build a Hydroponic System in Small Spaces
I did a video a while back about how to grow vegetables in a closet and I promised I would show you how my drip system works.
So this is a closet drip system for vegetables it’s a recirculating hydroponic system that uses top-feed drip irrigation
it’s not that hard to build and I want to tell you a little bit about it and show you how to build one for yourself
Automated Hydroponics
So first thing is drip irrigation from the top works great and can be automated so that you don’t have to go in and water.
All you really need to do is fill the reservoir with nutrients and monitor the level and make sure it doesn’t go down too far because plants can drink quite a bit
It runs on a pump with a timer so watering is all taken care of now. Timing is going to be something you’ll have to work out for yourself it’s going to depend a lot on the size of your pots and also on how big your plants are.
These pots are two and a half gallons they’re filled with grow stones. Grow stones are not being made anymore. Here are some alternatives i would recommend.
Because this is hydroponics you want to use an inert media.
That means grow stones or you can get hydroton those are like little clay balls that have been oven-fired and they work pretty good Hydroton will work fine you just have to remember to wash it before you use it because there’ll be a lot of red dust and stuff inside.
You can use chunky perlite too but it is not long lasting like grow stones or hydroton which can last forever.
You can even use coco coir because it is also an inert medium. However, because it holds more water you will need to alter your watering schedule to use it.
Nutrient Reservoir
So in this system, you have a reservoir directly under the top trays for them to drain into.
I am using a 20-gallon utility tub that I got from Home Depot for about $13 but it really holds more like 15 gallons. But it’s plenty big enough and it’s about two feet by three feet by about eight inches high
In my reservoir is the pump I use and it is connected to my fill fittings. I used a tee to run 2 lines one to each tote.
My Totes
The upper totes are set on boards and I have holes drilled through the boards for the intake and the drain fittings. My drain goes directly into my reservoir like a waterfall.
But for this type of system, you will need to add a fitting for your intake manifold.
You want just the screen on the drain fitting screwed in because you’re not trying to raise the water level but you want to keep medium out of the reservoir where your pump might suck it up.
Now to get these fittings in your tote you’re going to have to drill 2 holes in your tote Mine are spread apart near one end of the tote.
If you’re using Botanicare fittings use a one and an eighth-inch hole saw and it will be a little bit tight but you should be able to screw the fittings in.
Also on the fittings, you’ll notice there’s a rubber gasket. The gasket goes on the underside of your tote. So you’ll cinch them up.
You’ll need some half-inch tubing to get from the intake to your reservoir and your pump.
The other fitting is the three-quarter-inch drain I leave the end open and have it drain directly into my reservoir but you can use a piece of three-quarter-inch tubing for it but that’s how you tell them apart.
The drain fitting is a three-quarter inch on the bottom and the intake fitting is a half inch and you are going to need a half-inch standpipe and you’re going to use a half-inch slip to a half-inch male for the the manifold but you’re going to need to go from half-inch to three quarter on the bottom and that fitting can be kind of tricky to find but it is around.
You might also go with three three-quarter-inch male to slip and put a half-inch adapter in but that’s the hardest part of hooking this up in my opinion.
It’s just getting a fitting to go from three-quarters to half inch so if you can handle that you can handle anything here.
They do make some that have stuff inside to regulate the flow but you don’t want that you want the open flow version.
You also want to use this Floraflex tubing because it’s very flexible unlike the black stuff.
I use open-ended drip lines because regular drippers can plug and i don’t want to deal with clogs. I also use multiple drippers per pot just in case one clogs.
There are eight lines on a manifold and you want more than one drip line for more even watering and just in case one should get clogged your plants will still get watered.
Watering times will depend on the size of your pot, the size of your plant, and what you’re using for grow media.
If you’re using hydroton or grow stones your plants will need to be watered fairly frequently because they don’t hold a whole lot of water for very long.
I usually run about five minutes on and then I run about three or four hours in between waterings just depending on the plants.
Because I’m using a media like this it doesn’t have any buffering qualities like soil does or coco does and that means you feed at a lower level because these plants are going to get what they need almost constantly.
Because they’re being fed constantly they don’t need as many nutrients all at the same time as if you were hand watering.
The other thing is you probably want to use hydroponic nutrients because if you use organics stuff like that it could plug your emitters and it’s just not good for a hydroponic system
So you’ll be using hydroponic nutrients you will get better results. With a hydroponic system, your plants will grow faster and they will yield more too.
Lighting
You do need to have good lighting. You know you can’t grow plants in the dark they are photosynthetic and they need light. Most vegetables need 6 hours of direct sunlight. Indoors 12 hours of LED lighting works.
You can’t count on natural light indoors especially in winter when you want fresh vegetables most. You need an LED grow light to grow veggies year-round. I use the Spider Farmer SF 2000 in my kitchen garden and it works great for a 2 x 4 space.
So if your lighting’s on point and you get your watering dialed in you’ll be able to grow some really nice vegetables.
Once you get this set up it pretty much runs on autopilot so there’s not a whole lot that you need to do other than monitor your reservoir and for that, you really should have a TDS meter and a pH pen at the minimum to mix nutrients and monitor your reservoir.
If you have a closet and you don’t want to hand water you can set up a drip system for your vegetables and they will thank you for it because plants are a lot like people
They get habitual they want their feed and their water at the same time every day just like you want to eat lunch at noon every day and they do better when they get it consistently and at the same time every day.
So this is a great system it doesn’t cost a whole lot to set up and i think you’ll be happy with it.
 - Made from 100% Natural Clay, Can be used for Drainage, Decoration, Aquaponics, Hydroponics and Other Gardening Essentials")

")


