This post may contain affiliate links. If you buy something from one of our links we may earn a commission. Thanks
Are you looking for an easy and affordable gardening project? A great way to start is to learn how to grow microgreens in trays.
Trays are a great option for an indoor urban gardening project because they are inexpensive and take up very little space. They yield results fast too.
In this blog post, we will discuss how to grow microgreens in trays and provide some tips on how to get the best results.
What Are Microgreens?
Microgreens are immature greens that are typically harvested 7-14 days after planting.
Microgreens are a type of vegetable that is grown for its leaves, rather than its fruits or seeds. They are not the same as sprouts.
What’s The Difference Between Microgreens And Sprouts?
Microgreens are harvested when they are 2-3 inches tall and have their first set of true leaves. Usually, this takes about 2 weeks.
Sprouts, on the other hand, are harvested when they are just a few days old. Sprouts are young seedlings that don’t have any true leaves. They are usually sprouted with water while microgreens are grown in soil.
Because microgreens are usually harvested when they are between two and three inches tall and have true leaves they are more nutritious than sprouts.
They are packed with nutrients and have a more intense flavor and nutritional value than their mature counterparts.
Microgreens can be used in a variety of dishes, from salads to soups to sandwiches. They’re a great way to add some extra nutrition and flavor to your meals!
How To Grow Microgreens In Trays
Microgreens are easy to grow, and they can be grown in a variety of ways. One popular method is to grow them in trays.
There are several benefits to growing microgreens in trays. First of all, it is a very simple and straightforward method.
You don’t need a lot of special equipment or supplies, and you can get started with just a few basic materials.
Additionally, this method is very space-efficient, since you can grow a large number of microgreens in a small space.
Finally, growing microgreens in trays is a great way to get started with this type of gardening, since it is relatively low-maintenance and easy to learn.
What You Need To Start Growing Microgreens
If you’re interested in growing microgreens in trays, there are a few things that you should keep in mind. First of all, you will need to choose a tray that is shallow and has good drainage. You can find trays specifically designed sprouting trays for growing microgreens.
But you can use standard 1020 seedling trays. You will use 2 trays. One tray will have holes in the bottom for drainage.
The other tray will not have any holes. You will place the tray with holes inside the tray that has no holes.
You will also need to choose the right type of soil for your microgreens. A good quality potting mix or seed-starting mix will work well.
You can also use peat moss or coco coir. Coco coir is a better choice both environmentally as well as horticulturally.
It is a renewable resource with a neutral pH and better water holding and aeration properties.
Just make sure that any soil you use is light and airy so that the roots can easily penetrate it. But you can grow microgreens without soil too with coco grow mats.
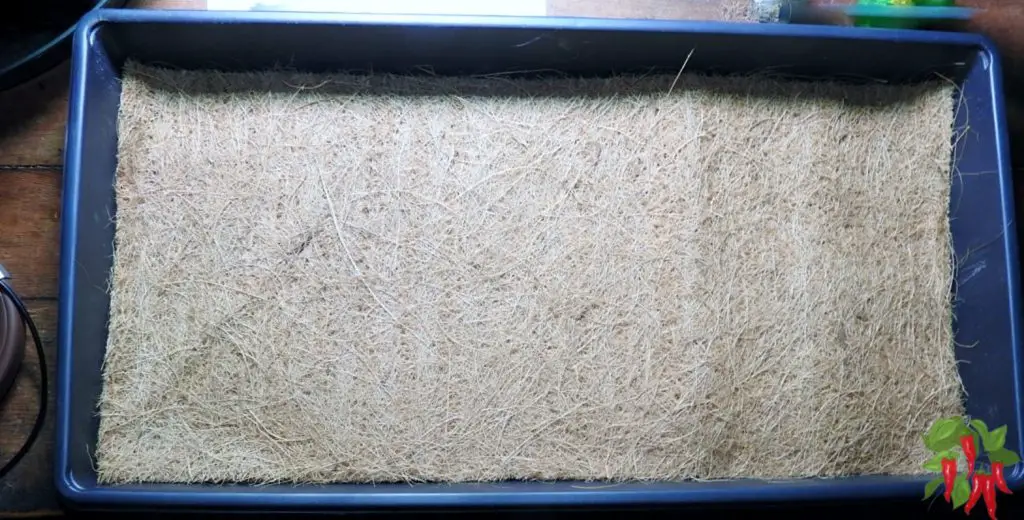
Using Coco Grow Mats For Microgreens
Microgreens are typically grown in soil, but they can also be grown using coco grow mats.
Coco grow mats are made from coconut fiber and are a sustainable growing medium.
They are a lot less messy than soil and much easier to store. You’ve probably seen thick coco door mats.
These are very similar. They are thinner and solid and they are cut to fit directly into your 1020 sprouting tray.
If you are growing indoors soil can be messy and using coco grow mats is an easier and cleaner option. They are much easy to store than bags of soil too.
Here are some tips for growing microgreens in coco grow mats:
1. Choose a sunny spot to grow your microgreens or use a grow light. Plants in coco grow mats need at least six hours of sunlight per day.
I recommend using a LED grow light for your microgreens. They need a lot of bright light to grow right and not etiolate (get leggy) and most windowsills will not have enough light in the winter.
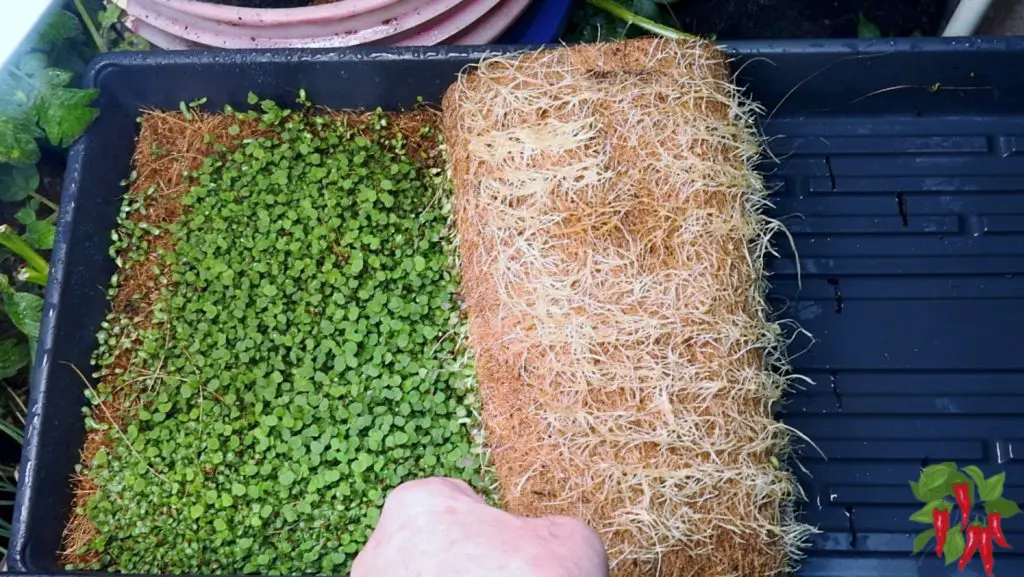
2. Make sure the coco grow mat is well-drained. Microgreens will not grow well in waterlogged conditions. Using the double tray method solves this problem.
Place your grow medium inside the tray with the holes. Place that in the solid tray. Cover it with water and let it soak for a few hours before draining off the water.
3. Sow the seeds evenly on the surface of the coco grow mat. Use your fingers to lightly press them into the surface.
You will want to seed evenly but on the heavy side so you get a full tray of microgreens.
4. Keep the coco grow mat evenly moist. Water your microgreens once or twice per day, depending on how dry the air is. Misting is a good way to do this.
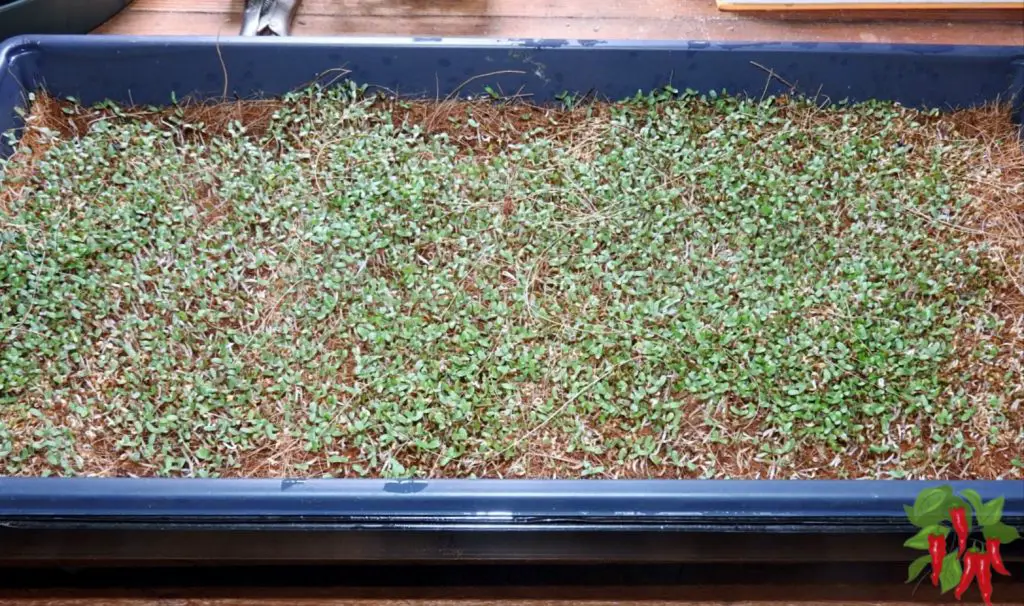
5. Harvest your microgreens when they are 2-3 inches tall. Use a sharp knife to cut them at the soil line.
Coco grow mats are a great way to grow microgreens year-round. With proper care, you can enjoy fresh, homegrown microgreens all year long!
Coco coir is often used like soil but it is actually a hydroponic growing medium. Read more about coco coir hydroponics.
What Microgreen Seeds Can I Grow?
Once you have your tray and soil, you’re ready to sow the seeds. You can use any type of microgreen seed, but some of the most popular varieties include radish, kale, and arugula. Wheatgrass and sunflowers are also very popular microgreens.
Buy seeds made for microgreens and sprouting. They are organic and non-GMO. Some regular agricultural seeds may be treated with fungicides so avoid those.
Important: Avoid Nightshades!
There are some seeds that should never be used for microgreens. Many popular vegetables are in the nightshade family.
While the fruit may be ok to eat their foliage is toxic. So don’t grow them.
Nightshade vegetables belong to the family of plants with the Latin name Solanaceae. Potatoes, tomatoes, peppers, and eggplants are all common nightshades. Many are rich sources of nutrients and serve as staple foods for various cultures. https://www.healthline.com/nutrition/nightshade-vegetables
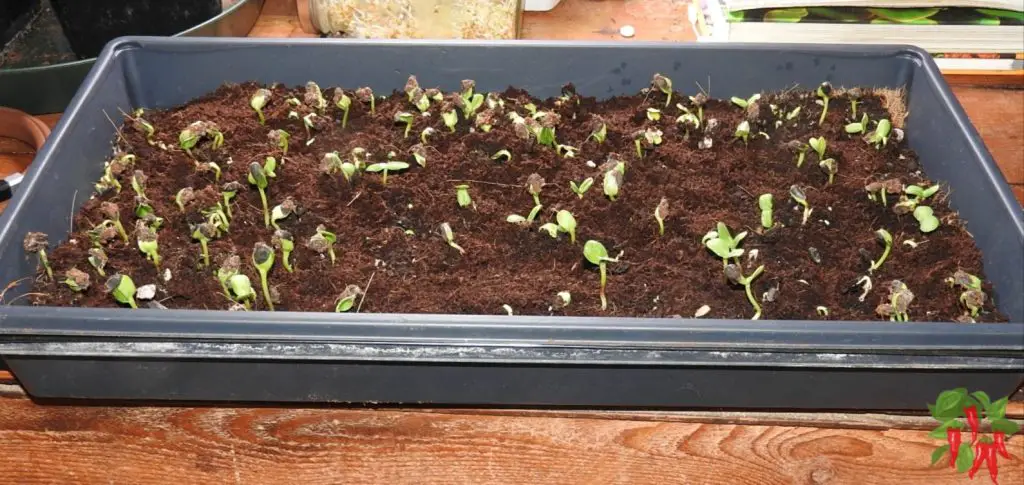
How To Grow Microgreens In Soil – Sowing Seeds
To sow the seeds, simply sprinkle them onto the surface of the soil and lightly press them down.
You don’t need to cover them with soil, since they will germinate in the light.
Some people like to use a cover to help conserve moisture and hasten sprouting. Remember to take it off right after germination if you do.
Once the seeds are planted, mist them lightly with water and place the tray in a sunny spot. They need at least 6 hours of strong light.
You might need a grow light to give them enough light, especially in the winter when natural sunlight can be scarce.
Keep the soil moist but not wet, and within a few days, you should see the first signs of growth!
When the microgreens are 2-3 inches tall, they are ready to harvest. Use a sharp knife to cut them at the soil line. Enjoy them in salads, sandwiches, or as a garnish.
To grow microgreens in trays, you will need:
• Seeds of your choice (vegetable, herb, or grain)
• Sprouting trays or 1020 trays with and without holes
1. Fill the trays with growing medium and moisten them with water.
2. Sow the seeds heavily and evenly over the surface of the potting mix.
3. Cover the tray using a tray as a lid to create a humid environment.
4. Place the tray or pot in a warm location.
5. Remove the cover once the seeds have germinated.
6. Provide the seedlings with at least 6 hours of sunlight or use a grow light.
7. Water or mist the microgreens regularly, keeping the soil moist but not wet.
8. When the microgreens are 2-3 inches tall, they are ready to harvest. Use sharp scissors or a knife to cut them just above the soil level.
9. Enjoy your homegrown microgreens!
Do You Need Fertilizer To Grow Microgreens?
Growing microgreens in trays is a great way to get started with this fun and easy gardening project and you don’t need to use any fertilizer to grow microgreens.
They can get all the nutrition they need to mature from the seed itself.
Now that you know how to grow microgreens in trays, give it a try! This fun and easy gardening project is sure to yield delicious results.
Growing Microgreens Indoors
If you don’t have a lot of space, or if you want to grow microgreens year-round, growing them indoors is a great option.
If you live in an apartment or condo and don’t have access to an outdoor garden this is perfect for you. Here are a few tips to get you started:
• Use a south-facing window for the best light exposure. During the winter you will need to use supplemental lighting like shop lights or LEDs.
• Place your tray on a windowsill or in a grow light stand.
• Water the microgreens regularly, keeping the soil moist but not wet.
• When the microgreens are 2-3 inches tall, they are ready to harvest. Use sharp scissors or a knife to cut them just above the soil level.
With these tips, you can enjoy fresh and healthy microgreens no matter what time of year it is. Give it a try!
Microgreens Growing Trays
You can grow microgreens in any shallow container. Many people used recycled food containers. They will work if you are very careful with your watering.
But because this type of container does not have drainage holes you can run into problems if you overwater your plants.
For this reason, using 1020 seedling trays is a much better option. These are the common plant trays you see past many garden centers.
True to their name they also measure about 10 x 20 inches in size. There are some that have drainage holes and some that don’t.
You will want to fill the tray that has holes with your growing media of choice. Place it inside the tray without holes to catch any runoff.
If you do overwater you can drain the bottom tray. If you can’t find any trays with holes you can easily add them to a tray with a drill or sharp knife.
Microgreen FAQ
Can microgreens be grown indoors?
Yes, microgreens can be grown indoors. They are a perfect crop to grow indoors if your space is limited and you want fast results. Just make sure to provide them with enough light.
When to harvest microgreens?
This is probably the most frequently asked question, and unfortunately, there is no straightforward answer.
The harvesting window for each type of microgreen varies depending on the vegetable, how it was grown, the humidity levels, the temperature, and how mature the plant is.
However, in general, you can start harvesting most microgreens when they are about 2-3 inches tall or about 2 weeks.
To get a better idea of when to harvest your microgreens, it’s helpful to understand how leaves develop on a plant.
The first set of leaves that sprout from a seed are called cotyledons or seed leaves.
These usually fall off once the second set of true leaves appears. The third and fourth sets of leaves are collectively called “true leaves.”
Once the microgreen has developed its first set or two of true leaves, it is ready to harvest.
When harvesting, you can cut the entire plant at the soil line. After harvesting, immediately rinse your microgreens with clean water and pat dry.
Store in a container or plastic bag in the refrigerator for up to a week. Enjoy your fresh and healthy microgreens!
How do you eat microgreens?
Microgreens are versatile and can be used in a variety of dishes, from salads to soups to sandwiches.
They can be eaten raw or cooked, and their flavor will vary depending on the type of microgreen. Try experimenting with different microgreens to find your favorite!
To eat microgreens, simply wash them and then add them to your dish of choice. If you’re eating them raw, you may want to chop them up into smaller pieces.
Cooked microgreens can be added whole or chopped up, depending on your preference.
How to store microgreens?
Microgreens can be stored in the fridge for up to a week. Simply place them in a moisture-proof container, such as a zip-top bag or Tupperware.
If your microgreens are looking a little wilted, you can revive them by placing them in a bowl of cold water for a few minutes.
Then, drain the water and return the microgreens to their storage container.
What are the benefits of eating microgreens?
Microgreens are a type of vegetable that is harvested when the plant is young – usually when it’s 2-3 inches tall.
They’re packed with nutrients and have a delicious flavor. Some research has shown them to be 40 times more nutritious than their mature versions.
Microgreens are packed with nutrients and antioxidants, making them a healthy addition to your diet. They’re also low in calories and fat-free, so you can enjoy them guilt-free!
Microgreens are an excellent source of vitamins and minerals, including Vitamins A, C, and E.
They’re also a good source of antioxidants and phytochemicals, which can help to protect your cells from damage. Eating microgreens is a great way to boost your nutrient intake and support your overall health.
Microgreens are packed with nutrients. While their nutrient contents vary slightly, most varieties tend to be rich in potassium, iron, zinc, magnesium and copper. Microgreens are also a great source of beneficial plant compounds like antioxidants. https://www.healthline.com/nutrition/microgreens
Microgreens are a great way to add some extra nutrition to your meals, and they’re delicious, too. So go ahead and give them a try – your body will thank you for it!
What types of microgreens to grow at home?
There are many different types of microgreens that you can grow at home. Some of the most popular include arugula, kale, radish, spinach, and sunflowers.
However, there are dozens of other varieties available, so feel free to experiment until you find your favorites. Microgreens are easy to grow and make a great addition to any meal.
Microgreens can be grown from many different types of seeds. The most popular varieties are produced using seeds from the following plant families:
• Brassicaceae family: Cauliflower, broccoli, cabbage, watercress, radish and arugula • Asteraceae family: Lettuce, endive, chicory and radicchio • Apiaceae family: Dill, carrot, fennel and celery • Amaryllidaceae family: Garlic, onion, leek • Amaranthaceae family: Amaranth, quinoa swiss chard, beet and spinach • Cucurbitaceae family: Melon, cucumber and squash
Cereals such as rice, oats, wheat, corn and barley, as well as legumes like chickpeas, beans and lentils, are also sometimes grown into microgreens .
Microgreens vary in taste, which can range from neutral to spicy, slightly sour or even bitter, depending on the variety. Generally speaking, their flavor is considered strong and concentrated. https://www.healthline.com/nutrition/microgreens#different-types
How to sow seeds for growing microgreens?
When growing microgreens you want to cover the entire tray with plants so it’s important to sow your seeds evenly.
This will ensure that all of your plants get the same amount of light and water and that they grow at the same rate.
To sow your seeds evenly, simply sprinkle them on top of the potting mix in your container. Then, use your fingers to lightly press them into the soil or coco mat.
Water lightly and place the container in a sunny spot or under a grow light. Keep the soil moist but not wet, and wait for your microgreens to sprout.
Some people cover them but it is not necessary. Just mist them. They can sprout just as well in the light.
Covering them restricts airflow and can lead to damping off or other diseases.
How often should you water microgreens?
Microgreens should be watered once or twice a day, depending on how dry the soil is. The soil should be moist but not wet – if it’s too wet, the roots will rot; if it’s too dry, the plants will wilt. Check the soil every day to see how dry it is, and water accordingly.


 But you can use standard 1020 seedling trays. You will use 2 trays. One tray will have holes in the bottom for drainage.